How to Hide Secrets Inside JPG Images Using Python
Learn how to hide secret messages or files inside JPG images using Python and a hex editor. A step-by-step guide to simple steganography.
How to Hide Secrets Inside JPG Imgaes
Introduction
The Hidden Potential of JPG Files
Imagine embedding secrets in plain sight, right inside a JPG image that anyone can see—but no one realizes the hidden data it contains. This is the essence of steganography, a method of hiding information within other seemingly innocent files. By exploiting the structure of JPG files and using Python’s capabilities, we can embed hidden messages or even entire files inside an image without altering its visible characteristics. In this guide, we’ll walk through the process of seamlessly inserting and extracting hidden data from JPG images using Python and a hex editor.
JPG File Structure and Steganography
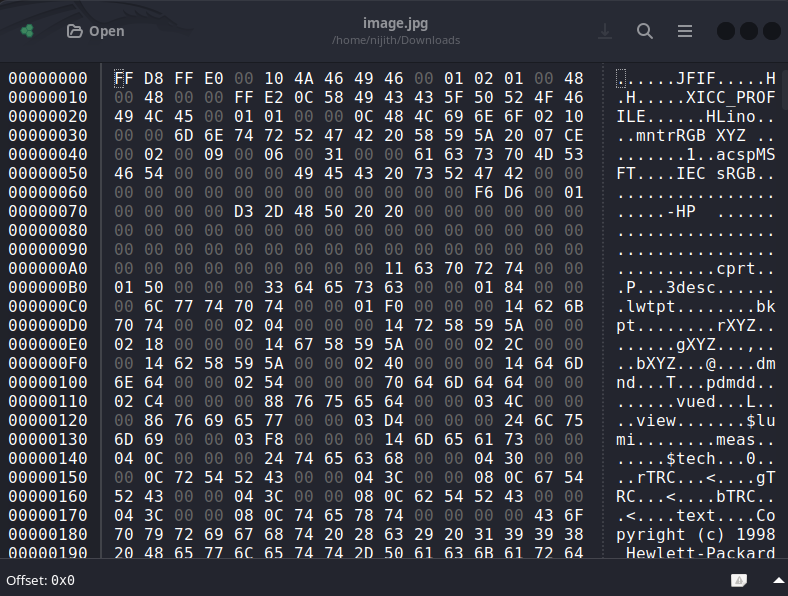
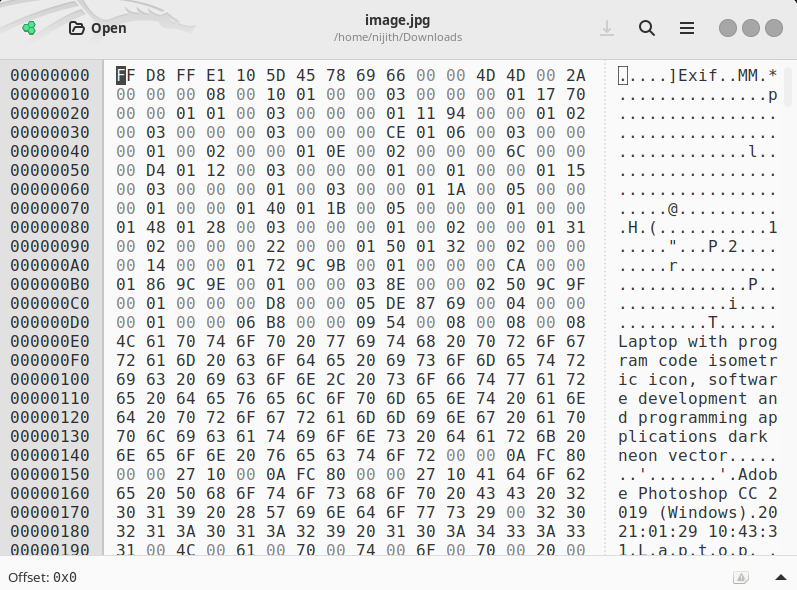
JPG files are essentially binary streams of data, bookended by specific markers. The file starts with a four-byte sequence (\FF\D8\FF\E0) and ends with a two-byte marker (\FF\D9). Here’s the magic: any data appended after this closing marker is ignored by image viewers, but it remains embedded in the file. This overlooked space becomes a perfect spot for embedding secret messages or hidden files—an ideal vehicle for rudimentary steganography.
By manipulating the binary data of a JPG image, you can insert concealed information without affecting the visible properties of the image. Using basic Python file operations, the hidden data can be injected or extracted with ease.
How to Hide Secrets Inside JPG Images Using a Hex Editor and Python
A simple way to hide data inside JPG images using a hex editor and Python. This technique leverages the JPG file structure to store hidden messages or even entire files without affecting the appearance of the image. We’ll also provide the code to inject and extract hidden content.
- Hex Editor (we will use
ghex) - Python (with file-handling functionality)
Step 1: Install ghex (Hex Editor)
The first tool you’ll need is a hex editor. We’ll be using ghex, a Linux-based tool, to directly manipulate the binary structure of JPG files. You can install it by running:
Run the following command on Linux:
1
apt install ghex
Once installed, open a JPG file in ghex:
1
ghex image.jpg
Any content added after the \FF\D9 marker will be ignored when displaying the image. However, it can still be extracted using a programmatic approach, such as Python.
Step 2: Injecting a Secret Message into the JPG Using Python
Python makes it incredibly easy to append data to files. Here’s how to inject a secret message into a JPG file:
1
2
3
4
# Injecting a secret message into a JPG file
with open("image.jpg", "ab") as f:
    # Write the secret message to the end of the image file
    f.write(b"my secret message")
This appends the message "my secret message" after the \FF\D9 marker, embedding it inside the image.jpg file without disturbing its visual appearance.
Extracting the Hidden Message from the JPG
Once your message is concealed, you’ll want a way to retrieve it. Python can be used to locate the \FF\D9 marker and extract any data that follows it:
1
2
3
4
5
6
# Extracting the hidden message from the JPG
with open("image.jpg", "rb") as f:
    content = f.read()
    offset = content.index(bytes.fromhex("FFD9"))  # Find the end of the JPG image
    f.seek(offset + 2)  # Move the pointer just after \FF\D9
    print(f.read())  # Print the hidden message
This code reads the entire image file, finds the position of the \FF\D9 marker, and then prints any data appended after it.
Embedding a File Within the JPG
Text isn’t the only thing you can hide. By following a similar process, you can also embed entire files—such as executables or documents—inside a JPG.
Injecting a File into the JPG
1
2
3
4
5
# Injecting an executable (or any file) into a JPG file
with open("image.jpg", "ab") as f1:
    with open("program.exe", "rb") as f2:
        # Append the contents of the executable to the image
        f1.write(f2.read())
Here, we append the binary data of program.exe to the JPG. This method works for any type of file, not just executables.
Extracting the Hidden File from the JPG
Once a file is hidden within the image, retrieving it involves reading and extracting the data after the \FF\D9 marker and saving it to a new file:
1
2
3
4
5
6
7
8
9
# Extracting the hidden file from the JPG
with open("image.jpg", "rb") as f1:
    content = f1.read()
    offset = content.index(bytes.fromhex("FFD9"))  # Find the end of the JPG image
    f1.seek(offset + 2)  # Move the pointer just after \FF\D9

    # Write the extracted file content to a new file
    with open("program_extracted.exe", "wb") as f2:
        f2.write(f1.read())
This code will extract the hidden program.exe file from the JPG and write it to a new file, which can then be executed.
Why This Technique Works
- Simple Yet Effective: This method doesn’t require complex steganographic algorithms, making it accessible to anyone with basic Python skills.
- Stealthy: The hidden data doesn’t alter the appearance of the image, making it an excellent method for covertly storing information.
- Cross-Platform Compatibility: The technique works on any platform where Python and a hex editor can run.
While this approach is an exciting way to experiment with steganography, it’s worth noting that it’s not particularly secure. Anyone who understands the structure of a JPG file could extract the hidden data just as easily as you can. For true confidentiality, more advanced encryption and steganography techniques should be employed.
This method, however, serves as a fascinating introduction to the world of data concealment!